We've done plenty of different upgrade, maintenance and repair jobs on RoadAbode. From repairing our entry steps to updating our couch and dinette seating areas and fixing small section of delamination. On all these jobs we research, read, ask questions and finally undertake the project. Most times it comes out pretty much how we envisioned, or even better!. Our recent project undertaken - removing our cracking decal stripe went so well that perhaps when tackling this latest project one week later, I was a bit too confident in our abilities to recoating the entire roof the way we did.
The recoating was a success, and RoadAbode's roof is completely recovered and looks great. We got the job done and are glad we were able to finish. If you would have asked us how the job was doing halfway through, we might have not been so positive. Below, we hope we can be informative and help if you decide to undertake this job. We'll be posting what EPDM is, what tools we used, the actual work, what we think we did right, and what we could have possibly done better.
What's EPDM and Liquid Roof?
RV roofs are usually covered by either fiberglass, or a EPDM rubber membrane, which is what RoadAbode's roof is made from. EPDM is used for buildings with flat roofs, in the automotive industry for door seals, for pond or pool liners, and of course, RV Roofs. It's perfect for RV roofs because of it's elasticity in cold and hot temperatures, and it's durability against UV rays. If we would have used EPDM sheet material, we would have had to remove the old membrane, all the vent covers and air conditioner, and re-glue the new material back on. For us, that would have been a near impossible task - without having multiple days and a dry place to store in betweenThe product we used is Liquid Roof by EPDM Coatings Inc. Liquid Roof is made specifically for RVs, and is true EPDM rubber, and is the only one sold in liquid form. It makes installations easy. It can be described as a liquid version of single-ply EPDM membrane sheet product. When sold, it includes a catalyst additive in a separate bottle that must be mixed with the the liquid EPDM. Once mixed, the material will bond chemically to the old roof material. When cured, it is all one piece.
 |
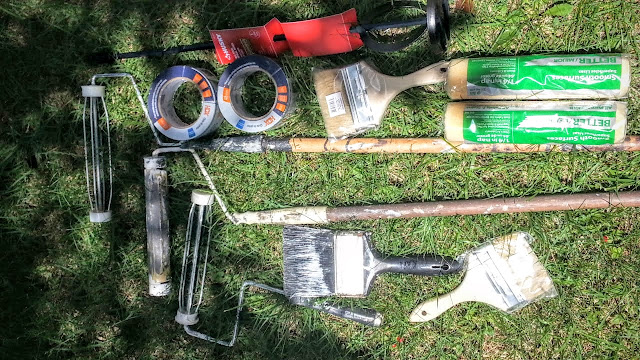
| Tools used to apply EPDM Liquid RV Roof |
The Tools
For a month before, I researched, bought and made sure we had the tools needed for the job. I knew that some of the tools would be used once - cleaning liquid rubber out of the roller cover or brush did not seem worth the time, or doable after. We had paint rollers, we just needed to get covers that had a short nap. We didn't want the rollers to hold the Liquid Roof as much as push it into place. I purchased the least expensive brushes possible - but wide. These were great for getting under the air conditioner (something we were not moving) and for cutting in along the vents and edges of RoadAbode's roof. I also purchased painter's tape for around the edge, to prevent dripping on the sides. The tape we used was 2 inches wide. Dripping didn't present too much of a problem because the Liquid Roof product is so thick. Still glad we protected the sidewalls. One tool that is very important and did not have was a drill driven five gallon paint mixer. This made sure the catalyst was thoroughly mixed with the Liquid Roof. To complete my "roofing" tools I also used RoadAbode's extendable ladder, a five foot folding ladder, tarp to work on while mixing or pouring the product, and the five gallon bucket full of EPDM Liquid RV Roof.Before we could start laying down Liquid RV Roof, we had to make sure it was clean. To do that we used a hot water and light bleach mixture, a mop, and a soft-bristled brush (one that we use for our car wheels worked nice)
Tools are together - time to get started!
 |
| Time Lapse of washing the roof and rest of RoadAbode |
The Work
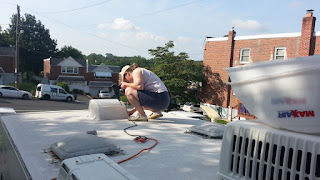
Cleaning the Roof We started gathering tools at 7:30am, and by 8am were getting on the roof. Amy first removed our MaxxAir vent covers so she could could clean well and access underneath them. To remove them, we first started with a ratchet, but found my drill was not much noisier for our neighbors at 8am, and was much quicker. |
| Removing the MaxxAir Vent covers |
 |
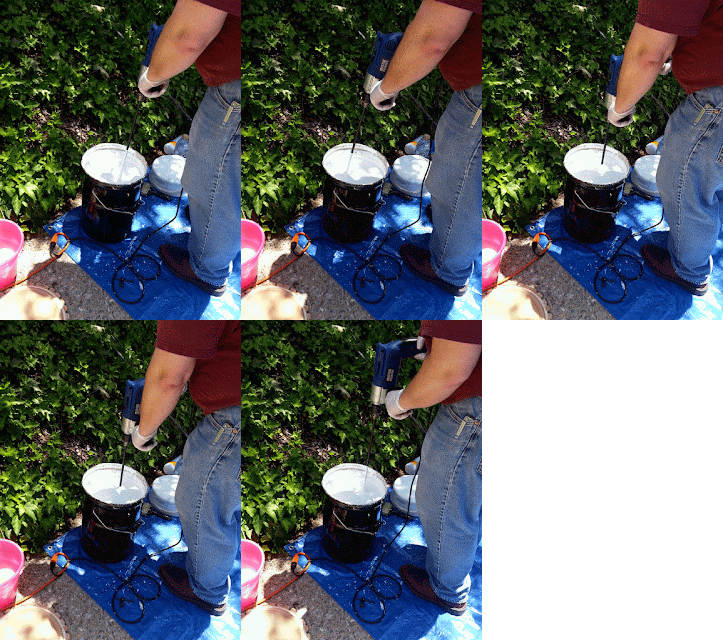
| Mixing Liquid RV Roof |
Since Amy finished with taping, I recruited her to pour the catalyst in while I started the paint mixing. With the vortex of paint moving, she poured it right down the middle as I mixed. The catalyst has a slight purple hue that quickly gets lost in the white of the Liquid Roof. How long to mix? Depends on what you read. The top of the can said two to three minutes. The label on the catalyst did not list a time. The online instructions said ten minutes. I made sure to use up and down strokes and move around the sides to get everything evenly mixed well. I stopped after eight minutes.
Time to apply our new roof!
Applying Liquid RV Roof Carrying a fifty pound bucket of goo was not on either of our agendas in the heat, so we opted to sacrifice a dollar store beach pail to carry up the ladder. We just used a throwaway larger plastic cup to dip-n-pour from the larger container to the smaller. This worked pretty well with the Liquid Roof, which has a consistency of warm marshmallow fluff.First portion of the job was cutting in around the vents and edges of the roof. This took longer than I expected, and the now mid-day heat did not help to speed up the process. Cutting in was done using two and thre in wide brushes. We also removed the top of the Refrigerator vent to more easily paint Liquid Roof around it. As Amy continued working around the vents and sides, I put away any tools or items we were done using. Amy took a much needed water break and rested inside to recoup from the heat. I did as well. After our fifteen minute break we resumed with coating the roof. Amy was able to work more quickly with the roller, but we found the cover kept slipping off. We exchanged the roller with one that fit tighter and less issue. Amy worked From front, down the driver side, to the back, and finished on the passenger side.
She was exhausted, and needed to lay down to recoup this time. It's then when I realized we still had lots of Liquid Roof left. After about 40 minutes, she felt well enough to had up small buckets to me as I poured more material on the expanse of the roof, and spread with the roller. It was slow going and hard to do leaning over from the side of RoadAbode, but I was able to do. It was not the preferable method, but did get the job done. We went through lots of gloves and had to start using some backup "food service" gloves that ripped more easily, and tended to slow me down.
Once we used most of the Liquid Roof, we started cleaning up. With my rush to finish using the product, I did get a good bit on the ladder which needed to be cleaned off.
 |
| Our Finished Roof (Air conditioner you see is our neighbors) |
The Finished Project
Though it was a tough job, we love the results! The next day we took RoadAbode back to where we store her, and will be putting our MaxxAir vent covers back on later in the week. We did see some bubbling, but expect these to go down as the product cures per others experience. RoadAbode has been with us for over ten years, so this project was needed.What We Did Right
Looking back at doing this project, there are the areas we think we did well.Protected our Skin with Sunscreen and Gloves - It was a very sunny day, so we made sure to use sunscreen. Even cloudy days you need to protect if you will be in the sun as long as we were. We wore throwaway vinyl gloves - they kept our hands clean as we handled the brushes roller and buckets used with the Liquid Roof. We went through quite a few pairs.
Stayed Hydrated - We made sure to drink plenty of water. Even more so because the day was hotter than expected, we tried to get into the shade and drink every 30 minutes or so. Amy ignored that a bit and we could see that her recoup time was not worth it. Plus who likes feeling queasy when trying to finish a job? Hydrate - and take breaks if you are in hot weather - and full sun.
Collected our Tools - Before we began, we made sure to have our tools at the ready. There was less hunting around, and more "grab and go" to get this project finished.
Used a Tarp - We used an inexpensive tarp. No matter how careful, some of the material ended up on the tarp. We did our mixing and pouring from the large five gallon to our smaller pail over the tarp. It also gave us a place to lay our brush and roller when we took a water break. Afterward, anything that we were not saving (and we did not try to clean the brushes or roller at all) was put into the empty can of Liquid Roof, or into the tarp and disposed of. I could imagine how much more work it would have been trying to remove solidified Liquid Roof from our sidewalk.
Started Early - We started gathering tools and readying our work area at 7:15am. Between washing the roof three times, and RoadAbode's sides twice, then letting dry, applying material to the final cleanup, we worked for a good nine to ten hours.
Washed/scrubbed the roof well - We wanted to make sure the Liquid Roof adhered well to the existing roof, so we washed with a bleach and water (mostly water) solution three times and rinsed between each wash thoroughly. We used a combination of a household strip mop and a soft bristle brush to remove anything loose, and make sure the roof was clean. We have washed the roof before, but probably never this well.
Rinsed Well - Rinsing with a strong jet (but not a power washer) is important. The spray left the existing roof material that was in good condition alone, but removed and washed away the dirt. I've seen videos where the white material was stripped from the black EPDM completely with a pressure washer, this is not what we wanted to accomplish. Ours old roof was still adhering well, and we want to the new material to bond to and build up onto what was existing.
Taped out the Edges - After the Roof was clean, and had dried completely, we taped the edges. Liquid Roof is pretty thick, but just in case we pushed to far to the edge, it gave us a line of protection all the way around RoadAbode. If it had dripped down her sides, it would have been another mess to have to clean up!
Read the Instructions - We read the instructions, but I think that some information on the website, and the PDF instructions linked via our email receipt may be contrary to one another. In the very least some measurements are off, or terms interchanged. We should have also read the Q&A facts on the website, which would had cleared up some of our questions like how long to cure, and how thick a layer we can put down. It's not brain surgery, but having more information would have helped.
What We Could Have Done Better or Differently
After all the sweat, sore muscles (and almost tears) these are the things we would do - differently.Worked in the Shade - If we had the room, or place to park her it would have been better for us to work in the shade. The sun really took it's toll on us as we worked throughout the day. Maybe an overcast day or less heat would have sufficed and kept us happier campers.
Wore Sunglasses - We experienced the same problem as snow blindness - when you've been out playing in or shoveling snow too long on a bright day. Go back inside and everything looks dark, and the lights have a pink hue! Because the roof is white (once clean) and the product is bright white, it was disorienting when coming off the roof and going in the house to grab a drink or rest in the shade. Sunglasses would have helped.
Use a Rubber Squeegee - to spread out the material moving the material is more like spreading marshmallow fluff than paint. I had seen recommendations to use a squeegee, I just did not heed them. I should have.
Kept Better Track of Product Usage - This was probably our biggest issue and what extended our day so long. Amy was doing the bulk of the roof work. She's great at painting walls at home because she gets the paint spread well and doesn't over use. The exact opposite idea should be used with Liquid Roof, and I didn't emphasize that idea to her enough. When she had coated the roof and though she was finished - there were still more than two gallons left in the five gallon bucket! We spread too thin!. She was exhausted, and we could now not walk on the roof to apply. So I stood on our ladder reached over, and poured the product on in sections, rolling over what she had already laid down. Fortunately, it still did not have a skin formed from drying yet, so as I applied and spread over the roof with the roller, the product leveled itself out onto the roof. In our rush to get the rest of the product on the roof, I ended up getting some on our ladder (which we use for RoadAbode's front bunk) on the pole for the roller, making it difficult to control and on me. So cleanup just took longer, and seemed more difficult since we were already hot, and tired. We did pretty good at keeping our emotions in check - and got through the issue. According to my reading afterword, "You can apply too little, but not too much". Just increases curing time. Lesson learned and noted.
Leave the Painters Tape on Longer - I did not find till after in reading how long to keep the painters tape on the sides of RoadAbode. We pulled off after we had cleaned up. We were worried that the Liquid Roof would adhere too tightly to the tape. Later reading we did on the EPDM website stated to leave on till the next day.
Do the Project Over Two Days. I read thisc idea on the EPDM website the night we were done. Since you only have 4 hours to work once the Liquid Roof can is opened and mixed, we could have purchased and opened a separate gallon first - to do the cut ins. Then next day roll and squeegee the five gallons on the roof. This idea would have cut the project into more manageable parts for our achy muscles.
Read the Q&A on EPDM Coatings Website - The Instruction PDF we got via email from the company is not very concise. The Q&A area of the website answers questions I didn't even know I had. I think some of how we would have done the project would had changed had we read these first.
Follow the link more information on Liquid RV Roof - Remember to check their Q&A section.
We'd love to hear from you - have you done this project? How'd it work for you? Did you do anything differently that we did? If you have questions, tips or comments leave them below.

2 comments:
Now that it has been 3 years since applying, would you recommend this product? Has it cracked or leaked in any places?
If you do not take good care of your roof and you are not vigilant when you see a leak, it will mean larger problems down the road. Having the coating will ensure you do not have to worry about leaking, or damage from UV rays. It is a nice solution all around.
Post a Comment